CLICK HERE FOR FREE BLOGGER TEMPLATES, LINK BUTTONS AND MORE! »

Thursday, September 26, 2013

Journal Tin and Post It Note Holder

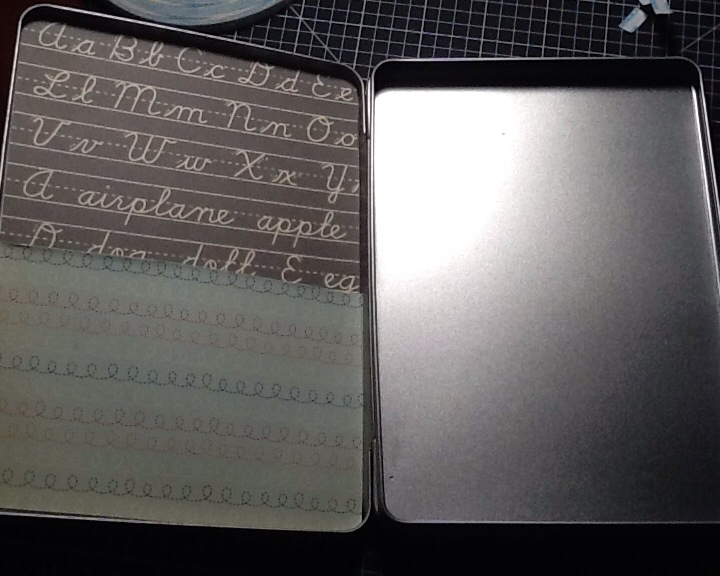
I desgined a new Journal Tin using a DVD tin and transformed it into something that holds a notebook, paper clip, a decorated pen and a small pocket on the left hand side. Here are a few pictures of what it looks like.

This is what the outside looks like when it is closed up.
 
This is what it looks like when it is open. As you can see on the left hand side there is a pocket and on the right hand side there is the paper clip, notepad and the pen.
 
Close up on the paper clip and the pen. Notice that I decorated the inside of the pen too.
These are great Christmas gifts, just because and a teacher's gift.


Now, here is the post it note holder
I used a piece of chip board for the platform and used scrapbook paper to cover the front and back. Than I used a binder clip and deocrated that to hold the post it note paper to the chip board. It's very easy to switch out the post it note pad when you run out of paper.
 
Happy Crafting
Shannon


Thursday, September 19, 2013

Post it Note Holder

Here is a great gift to someone that either likes to take notes or a great teachers gift. It's very simple to make. You start out with a piece of chipboard. You can make it any size you want. Next you determine what paper you want to use to cover the chipboard with. I sprayed it with adhesive, but I also put Scor-tape along the edges to hold it. Once that is done, I let it dry for a little bit. Make sure to cover both the front and back of the chipboard. Next, you take a medium size binder clip and cover that with matching or coordinating paper of your choice. You can decorate the clip with ribbon as well. Here is what it looks like.

I wouldn't use yellow post it note paper on this pattern paper, but I wanted to show you what it look liked put all together. I am currently waiting for my white post it note paper to come in.


I would recommend leaving the clips up so that it's not covering your post it note. If you want, you could had a piece of magnetic tape behind it and that way it could stick to the refrigerator.

Another thing I tried was putting a piece of paper on one side and most papers have a coordinating paper on the back and than putting that paper on the back. That gives you an option of what side you want to stick the post it note too.


One side


Back Side


Hope you enjoyed the project! I am starting up my own Etsy page to start selling the different things I make. Keep a look out for that to come.


Happy Crafting

Shannon


Friday, September 13, 2013

Supplies Cake

Every year I try and think of something to do for my son's teacher. With me being a teacher, I had to think of something that maybe I'd like getting too. I saw a great idea on Pinterest and had to try it. So here it is!!!!!


My son thought he needed to help or should I say is watch. LOL
 

The base is a heavy piece of card stock that I traced a circle on it than covered it with paper. In the middle is a roll of paper towels. You do not glue the towels down until you have the entire cake made. You wrap 6 notebooks around and holding them with a rubber band. I took one notebook wrapped around put the rubber band on it and than just stuck the other notebooks inside. Then I went to the bottom and lined up Grayson's and a glue stick the whole way around. I used the bottles of glue next using the top of my crayons as the base. Remembering to rubber band everything!!! Then I found a cup and cut it down so it wouldn't show and put glue sticks around that. I hot glued that to the top of the paper towels. I rubber banded the glue sticks around the cup. Now, your probably wondering how do I cover the rubber bands up. Well, you get ribbon of your choice and wrap it around the rubber bands and then decorate the rest. Wen your all finished you take the cake and I put pieces of packaging tape down on the circle and stuck it to it. Believe me the teachers will love it. I even had to make one for another teacher. My next try is a crayon wreath. I have already made 2 ruler wreaths.


Happy crafting

Shannon


Hard Covered Journal Tin

It seems lately I have been coming across a bunch of ideas that I must try! Sometimes when I take on a challenge it could be a flop at first, but that other times it comes out a success. With this project, I think it's going to be a success! I'm also in the process of putting together a store on etsy website to sell some of my creations.

Without further do, here we go. I ordered tin DVD movie cases from Amazon that you can remove the blue plastic piece in the middle so it becomes an empty tin. Then the decoration process started. I started with the outside decorating the front and back with the same type of paper except the back doesn't have the ribbon on that. Lets take a look...


Then, I switched to the inside and on the left hand side I covered the side with a coordinating paper and also at the bottom made a small pocket to keep things in.


Then I took a pen and decorated the inside of it to match the coordinating paper I had been using.


I am not completely done yet, because I'm still waiting for more product to arrive, but to give you the jest of what it will be, is a notebook on the right hand side with the pen and a larger paper clip decorated. I will keep you updated on the final outcome.

Questions for you.....

1. What type of papers would you like to see being used?

2. How much should I charge for one of these?

3. Any other questions you might have ask away....


Thursday, September 12, 2013

Bloglovin

Make sure to find me on bloglovin to keep up on all the updates!

Follow">http://www.bloglovin.com/blog/6262143/?claim=zdtp7cs4p2g">Follow

Personalizing Tumblers

So, I have always wanted to try new crafting ideas and the more I search the web, the more ideas I'm like I have to try that!!!! Let me tell you they don't always come out right the first time or even the second, but its like when you get bucked off a horse you always get back up on the saddle and do it again. Anyways, I will be the first to say this is by far NOT the best, but this is my first shot and I want to show everyone that practice makes perfect and it doesn't matter if you make mistakes as long as you keep trying. So, now that I became long winded here is what I've created. I will also tell you at the end what I need to change....so without further do...

I took a tumbler and attempted to put a saying on it. Things I've learned are:
1. It's hard to center lettering on the cup
2. The font needs to be smaller
3. How to get everything even and not one letter or word taller than another.
4. Determining what fonts work the best.
5. Lastly, doing more research on the vinyl and how to take care of it so when being washed and everyday use it does not fall apart.
I will keep trying and keep you updated!!
Happy Crafting!!!!!

Wednesday, September 11, 2013

Homevisit Sign

Here is a sign I've been working on for when I'm gone for homevisits.


Ruler Wreath

I've been working on different types of craft ideas.  Here is a ruler wreath that I created.  I am starting to experience with putting letters on cups and much more.  Keep watch to see updates!